Deploying a Pure-IPsec PKI VPN Server for Android Devices
Android offers built-in support for a handful of VPN configurations, including PPTP, L2TP/IPsec, and starting in ICS, pure-IPsec (without requiring L2TP).
Both pre-shared key (PSK) and public-key infrastructure (PKI) configurations are supported, but today we’ll be focusing on “IPsec Xauth RSA,” which uses PKI to connect. With good key management hygiene, certificates are much more secure than PSK, since you only need to share public keys and can keep private keys secret.
Today we’re going to turn an off-the-shelf Debian server into a pure-IPsec certificate-based server that our Android device can connect to. We’ll be cooking up our own certificates from scratch, and using racoon to handle key exchange and SA management. I’m assuming that our server has a static, publicly routable IPv4 address.
First we’ll start by installing IPsec tools and racoon:
# apt-get install ipsec-tools racoon
Generating PKI certificates
Next we’ll generate the certificates needed to drive our PKI configuration. This includes a new certificate authority (CA), a server certificate, and a client certificate. To make the configuration easier, you might want to edit some of the defaults in /etc/ssl/openssl.cnf:
countryName_default = US
stateOrProvinceName_default = California
0.organizationName_default = Setec
And let’s generate our certificates over near racoon:
$ mkdir /etc/racoon/certs
$ chmod 700 /etc/racoon/certs
$ cd /etc/racoon/certs
First let’s create our CA:
$ openssl req -new -x509 -extensions v3_ca -out myca.crt -keyout myca.key -days 3650
You can hit “enter” through most of the prompts, but be sure to provide good passwords and a unique Common Name for each certificate. Next let’s generate our server certificate and sign it with our CA:
$ openssl req -new -keyout myserver.key -out myserver.csr -days 3650
$ openssl x509 -req -in myserver.csr -CA myca.crt -CAkey myca.key -CAcreateserial -out myserver.crt
Next, let’s decrypt the server private key so that racoon can access it:
$ chmod 600 myserver.key
$ openssl rsa -in myserver.key -out myserver.key
And finally let’s generate a client certificate for our phone and sign it.
$ openssl req -new -keyout myphone.key -out myphone.csr -days 3650
$ openssl x509 -req -in myphone.csr -CA myca.crt -CAkey myca.key -CAcreateserial -out myphone.crt
While we’re working with certificates, let’s export our client public and private keys, along with our CA, into a PKCS #12 file, which can be easily imported by Android devices:
$ openssl pkcs12 -export -in myphone.crt -inkey myphone.key -certfile myca.crt -name myphone -out myphone.p12
I’d strongly recommend protecting it with an export password, since we’ll be pushing it to the SD card later, which is world-readable on most Android devices. (Unless you’ve enabled Settings > Developer options > Protect USB storage.)
Configuring server
Now that our certificates are ready, we can configure /etc/racoon/racoon.conf:
path certificate "/etc/racoon/certs";

timer {
  # NOTE: varies between carriers
  natt_keepalive 45 sec;
}

listen {
  isakmp 106.187.34.245[500];
  isakmp_natt 106.187.34.245[4500];
}

remote anonymous {
  exchange_mode aggressive,main;
  my_identifier asn1dn;

  certificate_type x509 "myserver.crt" "myserver.key";
  ca_type x509 "myca.crt";
  peers_certfile x509 "myphone.crt";

  passive on;
  proposal_check strict;
  generate_policy on;
  nat_traversal force;

  proposal {
    encryption_algorithm aes256;
    hash_algorithm sha1;
    authentication_method xauth_rsa_server;
    dh_group modp1024;
  }
}

sainfo anonymous {
  encryption_algorithm aes256;
  authentication_algorithm hmac_sha1;
  compression_algorithm deflate;
}

log info;

mode_cfg {
  auth_source system;
  conf_source local;
  accounting system;
  network4 10.44.0.0;
  netmask4 255.255.255.255;
}
This is a fairly typical configuration, but there are a few things worth noting:
First, we’ve carefully chosen our natt_keepalive value, which is the frequency at which our server sends UDP keepalive packets. When our client connects through a NAT, the NAT allocates a public-facing UDP port to receive packets from our server. If no packets are received within a specific timeout, the NAT reclaims that port for allocation to other clients.
So we have a tradeoff: if our keepalive is too short, we waste battery by sending unnecessary keepalive packets; if it’s too long, the port will be reclaimed by the NAT, disconnecting us. To help figure out the best tradeoff, I wrote a tool to empirically derive UDP NAT timeouts, and found these values for popular carrier networks:
Network UDP NAT timeout Verizon 4G LTE 60 sec T-Mobile HSDPA 90 sec AT&T HSDPA 120 sec
(When setting the natt_keepalive value for a T-Mobile device, I halved the timeout to give plenty of headroom, which explains the 45 sec value above.)
Second, it’s important to note that we’ve strictly limited the acceptable algorithms and key sizes for both IKE phases 1 and 2 to the strongest that ICS supports. Based on NIST recomendations, AES-256 should be strong enough to protect data beyond 2030, but 1024-bit asymmetric keys and SHA-1 hashes aren’t nearly as robust. If you’re building Android yourself, you could include stronger Diffie-Hellman groups and hashing algorithms.
Next, let’s add a NAT on the server so our Android device can reach the Internet when connected. We need to enable IPv4 forwarding, and create a Source NAT for all non-ESP traffic leaving the server:
# echo 1 > /proc/sys/net/ipv4/ip_forward
# iptables -t nat -A POSTROUTING ! -p esp -o eth0 -j SNAT --to-source 106.187.34.245
And let’s create a local user account for racoon to authenticate against:
# useradd -s /sbin/nologin setec
# passwd setec
Finally, let’s restart racoon to pick up our config changes:
# /etc/init.d/racoon restart
Configuring phone
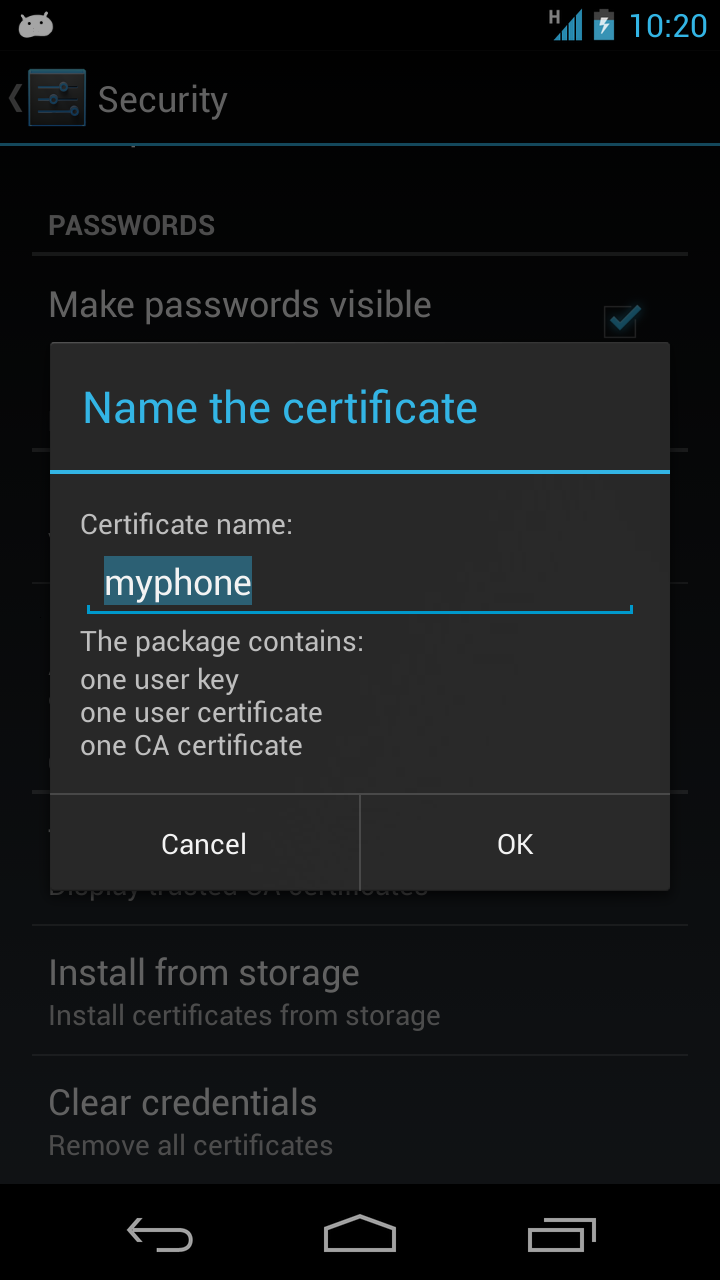
Now that our server is ready, we can configure our Android device. First let’s push the myphone.p12 bundle we created earlier:
adb push myphone.p12 /sdcard
Then we can import the bundle using Settings > Security > Install from storage. You should confirm that it shows the client key, client certificate, and CA certificate we packed earlier.
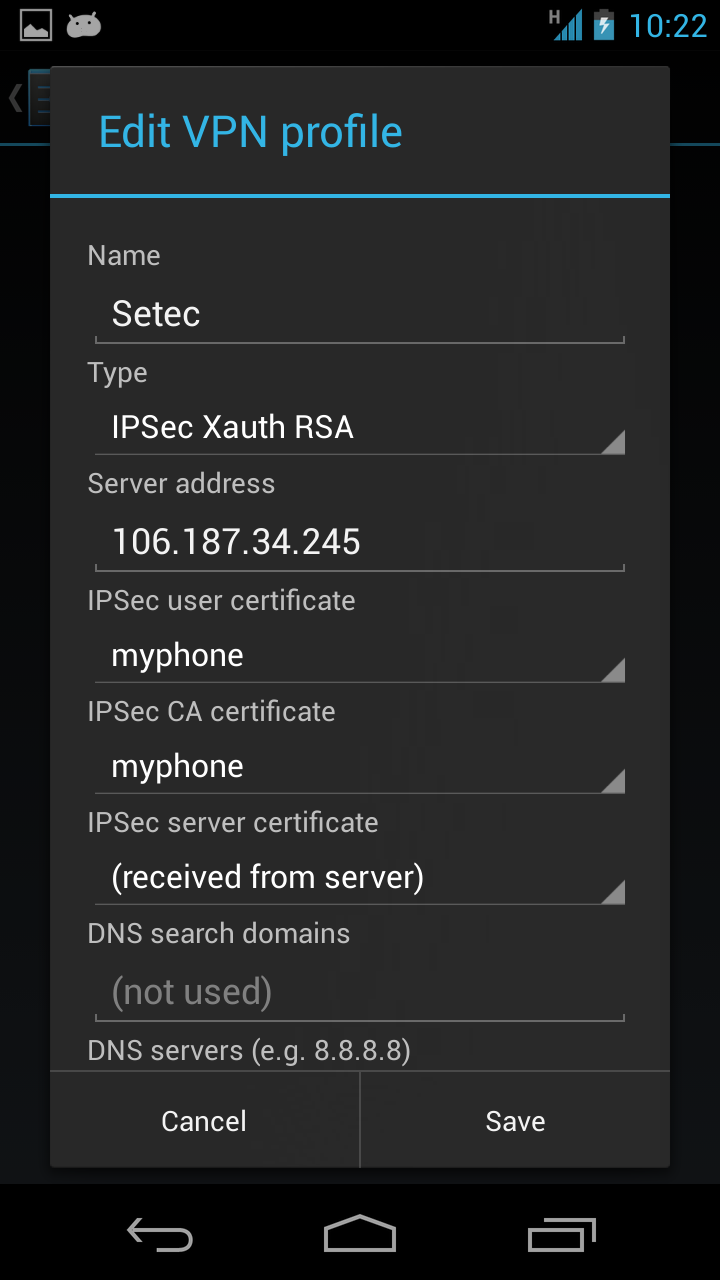
Next let’s configure the VPN client in Settings > More > VPN. Our VPN type is “IPsec Xauth RSA”, and we’ll use the client and CA certificates we just installed. You’ll also want to configure a trusted DNS server under advanced options. (Otherwise Android will use the DNS server obtained from the local network, which could live in a non-routable private network.)
Finally, we can connect to the VPN with the username and password we defined earlier.
Final notes
Configuring a certificate-based IPsec VPN is complex, and error messages along the way can be cryptic and frustrating, but hopefully this guide is enough to help you get a VPN server running.
Along the way, I found the L2TP/IPsec Gentoo wiki guide to be helpful, including commands for generating Android-compatible certificates, and details on configuring SNAT. Also an excellent summary of key length recommendations, citing references from NIST and others.
If you’re interested in lower-level details, the IPsec HOWTO has sections on kernel configuration and racoon, and generating X.509 certificates.